
Proper Operation
Learn how your appliance is supposed to operate so you can determine if it is malfunctioning.
- Dryer Controls
- Moving Air
- Automatic Cycles
- Moisture Sensor
- Even Heat Control
- Rotating Drum
- Generating Heat
- Dryer Sounds
This page contains affiliate links. For more information visit our
FTC disclosure page.
- Visit our sponsor for parts:

Replacing the Door Switch
The door switch stops the dryer the instant the door is opened. If your dryer has a light inside the drum, the light will be turned on when the door is opened. If the door microswitch fails open, the dryer will not start.
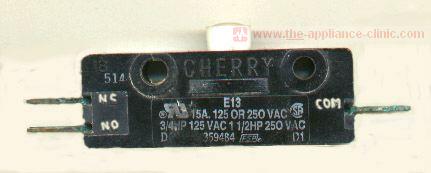
The microswitch is a single pole, double throw switch. The switch usually fails mechanically when too much current is passed through it and the armature is partially burned and melted. See the internal components in the following image:
Tools Required
- Strong putty knife
- Phillips screwdriver
Parts Required
Dryer door switch kit number 279347
Replacing the Door Switch
- (Figure 1) If the switch does not click when the actuater lever is depressed, it may have failed mechanically and must be checked and probably replaced.
- UNPLUG THE DRYER.
- Remove the lint filter and the two screws that were under it.
- (Figure 2) Insert a putty knife between the top and the cabinet, about 2.5" in from each corner. Push in and pull up on the knife handle to release the clips holding the top down. Don't use a screwdriver to release the clips or you may damage the finish. Pull the dryer out from the wall far enough that you can lift the top and rest it securely against the wall behind the dryer.
- (Figure 3) Locate the door switch and the two or three wires leading to it. It's to your right, between the front panel and the drum. If you want more room to work with the switch, remove the two Philup's screws holding the switch assembly in place and lift it out by the wires. The following figure shows a typical doorswitch assembly.
- Get your ohmmeter and set it to the lowest resistance scale.
- (Figure 4) Remove the wire from the COM terminal. Clip one probe on the COM terminal. If your door switch has three terminals like the one above, place the other probe on NC (Normally Closed). The ohmmeter should show zero or very low resistance with the door open. If not, the switch has failed. If you place the probe on terminal NO (Normally Open), it should show an open circuit (no meter movement) with the door open and should show low resistance with the actuator depressed and after hearing a "click".
- If the switch checks out OK, go back to Nothing Happens and select another subsymptom.
- If the switch doesn't function properly, use the appliance model number to order the correct replacement.
- Once the replacement switch is in hand, mark the remaining wires and remove them. If you haven't already done so, remove the two screws holding the switch assembly. Remove the switch assembly and slide the microswitch out of the bracket that contains the actuator lever.
- Reinstall the new switch and reconnect the wires. Reassemble the dryer and verify proper operation.
Click the banner to visit our sponsor to purchase parts:
