
Proper Operation
Learn how your appliance is supposed to operate so you can determine if it is malfunctioning.
This page contains affiliate links. For more information visit our
FTC disclosure page.
- Visit our sponsor for parts:

Direct Drive Water Inlet Valve
Problem Discussion
Normally water can not enter the washer unless the inlet mixing valve solenoids are energized (see Fill under Proper Operation).However, if foreign particles get past the filters, they can become lodged in the tiny valve orifice and prevent the metal plunger stem from seating. Water will then flow through the valve whether the washer power is on or off. Automatic washers are normally left unattended. Water flow during a wash cycle can lodge the foreign particle in the valve, causing the water to continue to flow throughout all of the cycle functions and after the washer has stopped. The tub will fill and then overflow. The only way to stop it is to turn off both water faucets connected to the inlet hoses.
Water inlet valves come in various colors. The colors correspond to the mixed water output temperature. I have seen red, beige and blue. I guess red is the hottest, beige is in the middle and blue the coolest. I don't think it makes much difference so I stock blue valves.
Replacement part no: 358276

Procedures for Replacing the Water Inlet Valve
- After the water is turned off and the floodwaters have subsided, either run the washer in a drain function or unplug the machine and bail it out.
- MAKE SURE THE WASHER IS UNPLUGGED.
- Verify that both water faucets have been turned off.
- Move the washer out from the wall about 20 inches.
- Remove the water hoses from the back of the washer.
- Remove the two 5/16" sheet metal screws securing the water inlet mixing valve (the screws are near the hose connections on the back of the washer).
- Remove the two screws down in front on both sides of the control console with a Philips screwdriver.
- Pull the control console forward and up to release it and then roll it back against the wall around its hinges.
- Locate the 2-wire harness with the connector that plugs into the top of the cabinet. The wires lead to the lid switch.Disconnect this connector by depressing its locking tab and pulling up (Figure 1).
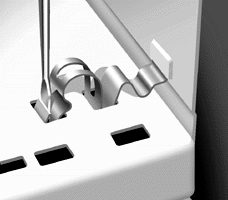
- Locate the two cabinet clips in each back corner. Place a flat blade screwdriver behind the front curled up edge of the clip and push back on the handle to release the clip. Repeat with the other clip. Remove the clips from the back panel. The cabinet is free now unless you have dispensers. The hoses for dispensers are under a little hose cover in the left hand corner. Open the cover and remove the hoses (Figure 2).
- Roll the cabinet forward to release it in back and lift it up in front to clear all of the cabinet tabs (Figure 3).
- Now you have access to everything that was inside the cabinet. Locate the water inlet valves in the upper right hand corner of the back panel, behind the tub.
- Compress the hose clamp and slide the clamp up the water inlet hose leading out of the top of the valve assembly.
- Note the color code for each of the four wires on the water valve and list the sequence on a piece of paper. Remove the wires and set the old valve aside.
- Replace the wires onto the new valve. Slide the hose down onto the new valve and slip the hose clamp back into place.
- Put the new valve hose connections through the two holes in the cabinet back plate. Replace the two sheet metal screws holding the valve in place. This completes the installation of the new water inlet valve.
- Replacing the cabinet is not quite as easy as removing it but observing how the cabinet interfaces with washer frame will speed this process up. The bottom edge of the cabinet front slides under the front frame crossbar and the cabinet sides rest on top of the side frame. Two guide posts, located on each side frame, slide into corresponding slots in the sides of the cabinet to align the cabinet with the frame (Figure 4).
- Align the washer back with the back edges of the cabinet so that the plastic strips are flush from top to bottom.
- If you can't get the back edge of the cabinet to drop into place, make sure that the rear guide posts are pointed straight up and not bent down. Sometimes it helps to hold one side in place by replacing the cabinet clamp and then work the other side into place.
- Snap the cabinet clips into place.
- Reinstall the cabinet connector.
- Roll the control console down around its hinges and drop the end cap tabs into the holes in the cabinet top and slide it back to lock it into place. Replace the two screws.
- Plug the washer back in and verify proper operation.


Click the banner to visit our sponsor to purchase parts:
