
Proper Operation
Learn how your appliance is supposed to operate so you can determine if it is malfunctioning.
This page contains affiliate links. For more information visit our
FTC disclosure page.
- Visit our sponsor for parts:

Timer Pause
Most Whirlpool built direct drive washers use what is referred to as a 'neutral drain' transmission. With that transmission design, when first going into spin the transmission is in 'neutral' which allows the motor to just turn the pump to drain the machine. After a set period of time the motor stops. When the motor restarts again the transmission 'shifts into gear' to allow the motor turn both the pump and start spinning the tub.
The timer must pause the washer motor briefly between drain and spin. If that pause does not occur, the washer will drain all the way through the spin part of the cycle until the timer comes to the end of the cycle without the washer ever spinning.
A failure of the timer to pause the motor could be because of shorted or 'stuck' contracts inside the timer or a damaged internal timing cam. In either case the timer would usually need to be replaced.
To verify such a failure, a simple test is available. Start a wash and let the washer get to the point of draining. Once most of the water is removed from the tub, open the lid long enough for the motor to come to a complete stop (usually 8-10 seconds). Once completely stopped, close the lid again. If the washer then starts spinning, it is a fairly good sign the timer is missing the pause and likely needs to be replaced. If the timer pauses but the transmission remains in 'neutral', an internal problem with the transmission is likely.
Procedure for Replacing the Timer
- UNPLUG THE WASHER.
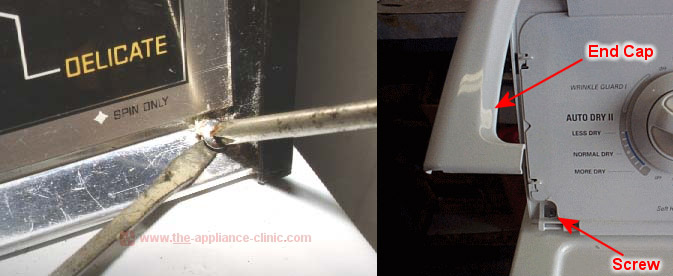
- (Figure 1) Remove the two screws down in front on both sides of the control console with a Philips screwdriver. On the newer washers you may have to remove a plastic trim piece on both ends of the control console to get at the screws. If the screws are rusted you may have to coax them out with a flatblade screwdriver behind the screw head while turning counterclockwise with a Philips screwdriver.
- Remove the two screws down in front on both sides of the control console with a Philips screwdriver. On the newer washers you may have to remove a plastic trim piece on both ends of the control console to get at the screws. If the screws are rusted you may have to coax them out with a flatblade screwdriver behind the screw head while turning counterclockwise with a Philips screwdriver.
- Pull the control console forward and up to release it and then roll it back against the wall around its hinges. (Figure 2)
- Disconnect the black lead from the timer motor that is inside the clear plastic sheath. Disconnect the black connector block and the white connector block if you have one.
- Roll the control console down again and unscrew the cycle control knob (turn counterclockwise). Gently pull the timer dial off the timer shaft.
- Remove the two screws securing the timer to the console and you will have it free.
- REPLACEMENT: Order the correct replacement timer by using the washer model number or the part number printed on the original timer. Reverse the removal procedure to put it back in.

Click the banner to visit our sponsor to purchase parts:
