
Proper Operation
Learn how your appliance is supposed to operate so you can determine if it is malfunctioning.
This page contains affiliate links. For more information visit our
FTC disclosure page.
- Visit our sponsor for parts:

Search
Replacing Gear Kit
General Information
The control head of the twist tray icemaker contains the gear train consistingof a motor, a big drive gear, a smaller timing gear and a drive pin. Abig cam drives the ice cube tray and controls the water fill function andthe cutoff of ice production.
A gear kit (Part No. 4318061) will replace the parts that usually wearout in this icemaker.

Procedures for Installing the Gear Kit
- Collect the gear kit and a Philips screwdriver before turning the refrigerator off. There is no way to work on the icemaker with the refrigerator runningso you will need to move right along through this procedure. Turn the refrigerator off and/or unplug it.
- Remove the icemaker side mounting screws (front, right hand corner). Removethe screw from the lower bin slot on the left side of the icemaker. Pullicemaker forward and then out. Unplug the connector from the back of thefreezer section and close the freezer door.
- Remove the ice cube tray by pushing the tray back into the rear bearingspring and pulling down.
- Remove the front plastic cover and the metal plate from the front of theicemaker.
- (Figure 1) Remove the two screws holding the water valve switch.
- (Figure 2) Move the shut-off arm up and remove the drive cam assembly.
- The drive pin is being held in by a spring wire (shown in red in the imageabove). Carefully remove the drive pin by pushing the wire spring awayfrom the pin and putting one hand over the pointed end of the pin. Thepin is spring loaded and will fly across the room when it is released unlessyou capture it. If you should loose the spring, the spring from an oldball-point pen works fine. Put the new drive pin and its spring in thecam assembly and lock the pin in place with the pin wire spring. Don'tthrow the old drive pin away yet because you can use it to align the newgears.
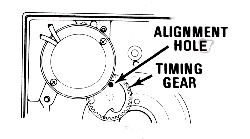
- (Figure 3) Remove and discard the old drive gear and timing gear.
- (Figure 4) Install the small timing gear in the position shown above. Confirm thatit is aligned by sliding the slender portion of the old drive pin downinto the alignment hole. If it slides in, you're done. If it doesn't, movethe gear one tooth at a time until everything is in alignment.
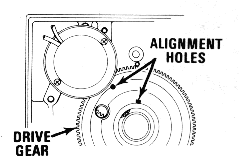
- Remove the drive pin from the timing gear and slide the big drive gear over the timing gear. Align the gear with the two alignment holes. Use the old drive pin to confirm alignment.
- (Figure 5) Position the drive cam assembly over the drive gear. Align the drive pinwith the hole in the drive gear.
- Reinstall the water valve switch using two screws.
- Check to make sure that all the wires are routed above the post and outof the way of the cam.
- Replace the front cover and reinstall the icemaker in the freezer section.


Click the banner to visit our sponsor to purchase parts:
