
Proper Operation
Learn how your appliance is supposed to operate so you can determine if it is malfunctioning.
This page contains affiliate links. For more information visit our
FTC disclosure page.
- Visit our sponsor for parts:

Search
Replacing the Heater Coils
The heater section is located behind the drum and consists of resistance wire coils suspended in ceramic insulators. The heater section provides the heat to dry your clothes. The GE/Hotpoint dryer has two coils; one for low heat and both for high heat. If your dryer's performance is unimpressive in the high heat settings it may have lost one set of coils and if you get no heat, you may have lost them both!
Procedures for Gathering Confirming Data
- Disconnect the power cord and move the dryer far enough away from the wall that you can tip the top up and it will stay there.
- There are screws holding the top of dryer down. Use a Torx #15 screwdriver to remove the screws. Lift the top up and swing it back against the wall or whatever is behind the dryer.
- Verify again that the power cord is unplugged.
- Examine the high limit thermostat on the top of the heater shroud behind the drum. Check for continuity through this thermostat. Go to the thermostat section for further fault verification and replacement information.
- Locate the 3 insulated studs and check for continuity between them. Put your ohmmeter in the lowest resistance range and measure the resistance between the three heater element terminals. If you read 18 to 20 ohms, the heater element is OK. If your meter doesn't move, the coils may be broken and you need to proceed on to their replacement. If you don't have an ohmmeter proceed on to the replacement procedure where you will remove the drum and you can examine the coils for broken heater wires.
Tools Required
- An ohmmeter would be nice but is optional
- 5/16 inch nut driver
- No. 15 Torx screw driver
- Wire cutters are handy for getting the old coils off and needle nosed pliers are handy for getting the new coil wires on the terminals
Parts Required
- GE WE11X260 dryer element coil kit. I recommend replacing both coils even if only one is open.
Procedures for Replacing the Heater Coils
- If you have skipped the data gathering steps above, unplug the dryer, disconnect the dryer vent and pull the dryer far enough away from the wall to get behind it.
- Use a 5/16 inch nut driver to remove about 10 sheet metal screws from the rear access panel. Remove the panel and slide it down the power cord to get it out of the way.
- Make a little drawing of how the belt is routed around the idler pulley and the motor pulley. Reach in and relieve the tension on the belt by moving the idler pulley away from the belt. Slip the belt off the motor pulley and idler pulley.
- Locate the metal plate on the back of the dryer behind the drum. Use a 5/16 inch nut driver to remove the screws and then the panel.
- Use a small screw driver to pry the e-clip off the end of the drum shaft. Keep a finger on this e-clip as you ease it out or it will fly away and you will have to hunt for it. Carefully remove the three washers on the end of the shaft. The drum is now free to slide out of the rear bearing.
- Use a 5/16 inch nutdriver to remove the two screws inside the cabinet, near the top on either side that hold the front of the cabinet on.
- Lift the front off the two screws down at the bottom and swing the front around to the right without disconnecting any wires and lean it up against the side of the cabinet.
- Grip the drum with one hand at the rear and the other hand at the front. Be careful not to cut yourself on the razor sharp edges on the porcelain coated drum. Pull the drum forward to clear the rear bearings and then lift it up and out. Leave the belt on it and set it aside.
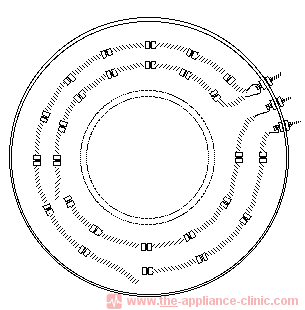
- (Figure 1) Now you have a good view of the heater shroud and coils. It will be easy to locate the breaks in the coils.
- Remove the broken coils. This task is made easier by cutting up the old coils into several pieces and carefully pulling them through the standoff insulators. Be gentle with the insulators as they are fragile.
- If these were original coils, the ends of the coils will be welded to the terminal bolts. Cut the wires off and remove the old terminal bolts by loosening the outer nut and disassembling the insulators. If the old terminals have the wires sandwiched between two nuts, loosen the nut on the end of the terminal. Again, be careful not to put too much torque on the nuts or you will break the insulators. Remove the remaining old wires.
- Prepare the coils for restringing by stretching them to specific lengths. Stretch the inside coil to 42 1/2 inches and the outer coil to 49 1/2 inches. These lengths are for a relaxed coil. It is better to have the coils too short than too long. If you stretch them too far, the coils will sag down and touch the metal heater shroud and burn up.
- Install the new terminal bolts through the insulators. Be careful not to break an insulator. You can't safely install the terminals with broken insulators and another trip down to the parts store to get new ones will slow down your repair a bunch.
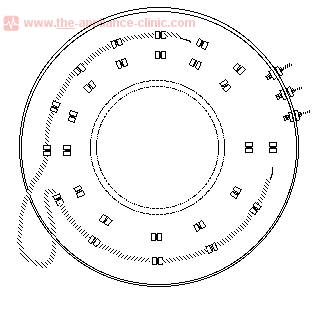
- (Figure 2) Start threading the new coils through the insulators on the side opposite the terminals and work in both directions toward the terminals.
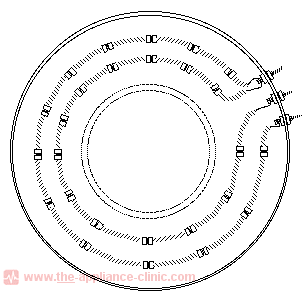
- (Figure 3) Note that both coils are connected to the top terminal and the other two ends are connected to the remaining two terminals.
- Use a needle nose pliers to wind the wires around the terminals between two washers and nuts.
- Slide the drum into its rear bearing
- Replace the three washers and the e-clip on the drum shaft in back of the dryer. Replace the bearing cover plate.
- Loop the belt behind the idler pulley, pull it back and then loop the belt around the motor pulley.
- Replace the rear panel and the dryer vent.
- Swing the front panel around and position it on the two lower screws. Use a 5/16 inch nut driver to replace the two sheet metal screws at the top.
- Lower the top and secure it with the 4 Torx screws.
- Plug in the power cord and check for proper operation.
Click the banner to visit our sponsor to purchase parts:
