Home Page > Troubleshooting and Repair > GE Electric Dryer > Broken Belt?
Proper Operation
Learn how your appliance is supposed to operate so you can determine if it is malfunctioning.
This page contains affiliate links. For more information visit our
FTC disclosure page.
- Visit our sponsor for parts:

Broken Belt?
The drive belt turns the drum. Due to its benign environment, the belt rarely breaks due to wear. I have seen several belts lately that have become tangled in the idler pulley and the motor pulley and severed. They showed little sign of wear but have been ripped apart in one spot. A broken belt is very obvious - the motor starts up and the heater comes on but the sound of a turning drum is absent. You can pop the door open and the drum will not be moving. If you have put clothes in, you may be smelling burning or scortching fabric.
Checking the Belt
- UNPLUG THE DRYER.
- Disconnect the vent hose and pull the dryer away from the wall.
- Remove all of the 5/16 inch sheet metal screws securing the rear access panel.
- Pull the panel out and look for the belt. If it is broken, it may still be draped around the drum or lying on the bottom of the dryer. If it is still in one piece, pull it through towards the motor so you can inspect all of it. If it is severely frayed, you will have to replace it. Don't worry about cracks.
Replacing the Belt
- UNPLUG THE DRYER.
- Disconnect the vent hose and pull the dryer away from the wall.
- Open the front door and remove the 4 Torx screws using a # 15 Torx screwdriver.
- Get a 5/16" nutdriver and lift the top up. You can rest the top on your head for this step. Remove the two 5/16" sheet metal screws inside and near the top on both sides of the front panel.
- Lift the front panel and door up and off the 2 screws on the bottom and swing it around and prop it up against the side of the dryer without disconnecting any of the wiring.
- Remove all of the 5/16 inch sheet metal screws securing the rear access panel and pull the panel out.
- If the belt is still on, relieve the tension on the belt by pushing the idler pulley down and then slip the belt off the motor pulley and then off the idler pulley. Now lift the top up and pull the belt towards the front of the drum. Lift the drum up just enough to slip the belt out between the drum and the drum slides.
- Lift the drum up in the front and slide the new belt under the drum and two thirds of the way back onto the drum.
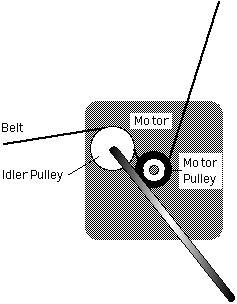
- Go to the rear access panel opening and push up on the idler pulley while routing the new belt around the idler pulley and motor pulley as shown in Figure 1 .
- Check to see if the belt is lined up perpendicular to the shaft so that the belt won't jump off the pulley when you start the dryer.
- Replace the rear panel and screws.
- Lift the top (hold it on your head again), position the front panel on the two lower 5/16" screws, Replace the two 5/16" screws securing the front panel to the cabinet. Lower the cabinet top. Replace the 4 Torx screws
- Plug the dryer in and check for proper operation.
Home Page > Troubleshooting and Repair > GE Electric Dryer > Broken Belt? > How old is my Appliance?
All of the information in these Appliance Clinic procedures is provided FREE OF CHARGE. No liability is assumed by the author for the accuracy of the contents or damages caused by the use of these procedures.


