
Proper Operation
Learn how your appliance is supposed to operate so you can determine if it is malfunctioning.
This page contains affiliate links. For more information visit our
FTC disclosure page.
- Visit our sponsor for parts:

Direct Drive Washer Gearcase/Transmission
Problem Discussion
The transmission gearcase provides the back and forth action of the agitator shaft for the wash cycle, spins the basket during the spin cycle and is supposed to do nothing during the pumpout cycle. If the gearcase is not performing its functions or is making strange noises, it may have to be replaced.
The first thing to do is to determine if the transmission is still in warranty. If your machine is less than 5-years old, check your owner's manual for warranty coverage. Many washers sold before 2006 have a 5-year part warranty on the transmission. If it is needed and within the warranty period, you should call for warranty service to have the transmission replaced under the warranty. BTW The warranty usually covers the part only and you will likely be responsible for the service charge and labor to perform the work.
Use your model number to order a new gearcase if your old one is out of warranty.
Procedures for Replacing the Gearcase
- MAKE SURE THE WASHER IS UNPLUGGED.
- Turn the water off and remove the water inlet hoses and remove the drain hose from the sewer inlet.
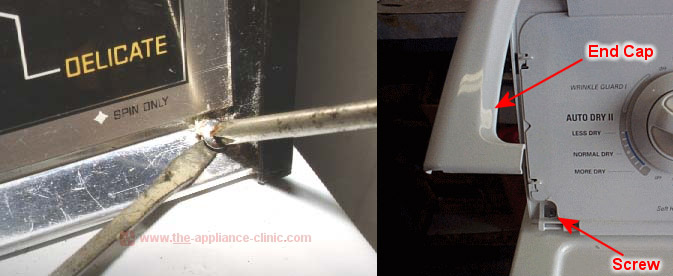
- (Figure 1) Remove the two screws down in front on both sides of the control console with a Philips screwdriver. On the newer washers you may have to remove a plastic trim piece on both ends of the control console to get at the screws. If the screws are rusted you may have to coax them out with a flatblade screwdriver behind the screw head while turning counterclockwise with a Philips screwdriver.
- Pull the control console forward and up to release it and then roll it back against the wall around its hinges.
- (Figure 2) Locate the 2-wire harness with the connector that plugs into the top of the cabinet. The wires lead to the lid switch. Disconnect this connector by depressing its locking tab and pulling up.
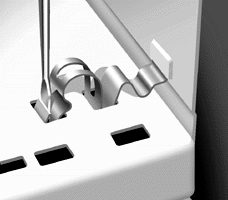
- (Figure 3) Locate the two cabinet clips in each back corner. Place a flat blade screwdriver behind the front curled up edge of the clip and push back on the handle to release the clip. Repeat with the other clip. Remove the clips from the back panel. The cabinet is free now unless you have dispensers. The hoses for dispensers are under a little hose cover in the left hand corner. Open the cover and remove the hoses.
- (Figure 4) Roll the cabinet forward to release it in back and lift it up in front to clear all of the cabinet tabs.
- Now you have access to everything that was inside the cabinet. Locate the water pump down in front and pry its two clips off with a flat-blade screwdriver. Pull forward on the pump to slide it off the motor shaft. Don't disconnect the hoses but fold the pump and hoses out of the way to the left.
- Remove the motor electrical connector from the right side of the front of the motor.
- Use a nutdriver to remove the two front screws holding the motor straps in place.
- Use a flat-blade screwdriver to pry the clamps off the motor. Remove the bottom clamp first. Slide one hand under the motor and release the top clamp. The motor is free and you can slide it out. The motor shield will come out with the motor. There are four rubber grommets between each of the motor studs and the motor mounting plate. Remove the grommets for safe keeping.
- Slide the motor out along with the coupler and black rubber isolator.
- Open the top of the agitator and remove the bolt with a 7/16 inch socket wrench. Pull the agitator off the agitator shaft.
- Pull the washer away from the wall and lay it down on its backside.
- Use a socket wrench to remove the three bolts holding the gearcase to the tub frame. The gearcase is now free and can be pulled out of the washer.
- Remove the spin tub thrust bearing if it stayed with the agitator shaft. Now remove the spin clutch by first removing the support ring from its groove in the agitator shaft using a flat blade screwdriver. Now remove the retaining ring holding the clutch to the spin pinion. Slide the clutch off the agitator shaft. This completes the removal of your old transmission.
- Put the old spin clutch on the new gearcase. Replace the spin tube thrust bearing and slide the agitator shaft into the old spin tube. Replace the bolts and orient the motor mounting plate so that it faces forward.
- Put the black rubber isolator on the transmission coupler by lining up the isolator holes with the three studs.
- Put the motor plate on the bottom of the motor and secure it with the two grommets on the bottom. Put the rubber grommets on the motor studs with the widest end facing the motor.
- Slide the motor coupler studs into the rubber isolator by rotating the other end of the motor shaft to help align them. At the same time, guide the rubber grommets into the four holes in the mounting plate. Make sure that the motor is positioned so that the electrical connector in front is pointed to the right. When everything is in place, snap the motor clamps down on the motor and replace the screws that secure them. Replace the motor connector.
- Fold the water pump back in front of the motor and onto the front motor shaft. Snap the pump straps back in place.
- (Figure 5) Replacing the cabinet is not quite as easy as removing it but observing how the cabinet interfaces with washer frame will speed this process up. The bottom edge of the cabinet front slides under the front frame crossbar and the cabinet sides rest on top of the side frame. Two guide posts, located on each side frame, slide into corresponding slots in the sides of the cabinet to align the cabinet with the frame.
- Align the washer back with the back edges of the cabinet so that the plastic strips are flush from top to bottom.
- Snap the cabinet clips into place.
- Reinstall the cabinet connector.
- Roll the control console down around its hinges and drop the end cap tabs into the holes in the cabinet top and slide it back to lock it into place. Replace the two screws.
- Reconnect the water inlet hoses and put the drain hose back in the sewer drain.
- Plug the washer back in and verify proper operation.


Click the banner to visit our sponsor to purchase parts:
